Choosing Fins and Booties

I know it’s been a few months since I posted…. I’m going to finish up here and then in my next post I’ll write about what I’ve been doing 🙂

As I’ve mentioned in my earlier blog posts on choosing equipment, I’m writing these pieces mainly for those who are new to diving. They reflect my opinion and experience. I always suggest that you seek advice from your instructor as they may have a different and maybe a better way than I do 🙂

TYPES

Fins are basically divided up into two types… full foot, that you put on like a slip-on shoe, and open heel fins with straps. There are several variations of these two types. There are bladed fins with different materials to channel the water when kicking. Those may be stiff or flexible, or somewhere in between. There are versions of the standard blade fin that are split, and another version which has vents to channel water. There are shorter fins designed for snorkeling and very long fins used in free-diving.

FULL-FOOT

Full-foot fins tend to be lighter in weight. Many are designed for snorkeling so make sure the ones you choose are heavy enough to do the job. Short and very lightweight fins that are adequate for snorkeling will not provide enough thrust for scuba diving. Some divers prefer full-foot fins when diving from a boat or a sandy beach in tropical water. These fins are worn with bare feet or thin socks. In areas where the water is colder they would not be suitable as booties would be required for warmth. Booties are also a requirement for many beach entries especially across rocks or coral. I have a few friends who use free diving fins (a whole different animal from standard snorkeling fins) when boat diving and swear by them. Freediving fins have a larger surface area which gives them more thrust. This larger surface area is the result of being much longer giving them a “snap” as the diver kicks which generates even more power.

A good quality full-foot fin will have a solid, rigid sole which is more efficient in transferring energy from the foot to the blade of the fin. A full-foot fin should have enough space to insert your pinky in between your heel and the back of the foot pocket. If you can’t get your pinky in, then the fins are likely too tight. To much space and the fin will be too loose. These type fins will definitely be more slippery in the water and feel looser, so keep that in mind. Make sure there are no spots digging into your foot. Sit on a stool or chair and flex your feet. If your toes are sticking out make sure they’re not squeezed or that the top edge is rubbing. If your feet are prone to cramping or blistering, this may not be the best choice.

Aqualung Express Full-Foot Fin

OPEN HEEL

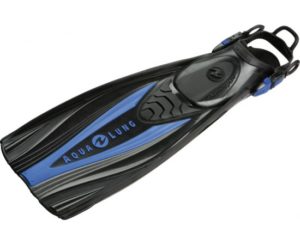
Most scuba divers use open heel fins with straps that are designed to be worn with booties or boots. These fins are available in a variety of materials and versions. Materials include, monoprene, polyprophlene, thermoplastic, and of course rubber. Some fins will combine these materials. The main variation in design will be blade fins (with a variety of stiffness), split fins, and vented fins. Most new divers (and many experienced ones) stick with the standard blade fin.

Fins can have differences in flexibility. Stiff fins are generally considered superior for frog kicking and maneuverability. They work well for backing up or for maneuvers like the helicopter turn. For a standard flutter kick though, the added resistance can bring on fatigue much quicker for those who are not conditioned for it. A more flexible fin is easier to kick with and is less tiring.

Split fins have a section removed from the center, thus “splitting the fin”. The theory behind split fins is that on the down stroke (the power stroke) the fin creates a “vortex” adding to forward propulsion. On the upstroke, which doesn’t provide as much power anyway, resistance is lowered by allowing water to flow through the split. It’s a popular design for divers who have ankle or knee problems or who cramp easily. Easier kicking can also translate into better air consumption.

The primary con with split fins and very flexible fins, is that they do not provide as much propulsion as the stiffer blade fins. They lack the power in dealing with current that a stiffer fin provides. They are not as effective in frog kicking, backing up, or performing maneuvers like helicopter turns. The stiffer fin is superior for these maneuvers.

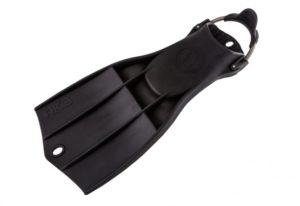
A popular fin for tech divers, cave divers, wreck divers, and underwater photographers is a version of the bladed fin sometimes called turtle fins. These fins tend to be a bit shorter and wider than a standard bladed fin. They are stiff and have vents that allow water to pass through reducing drag and increasing efficiency. They require strong legs, especially for the flutter kick. They will move you through the water quickly and efficiently. These fins are much more effective at fighting current than lesser versions. They are superior for maneuverability as well. Versions include the Aqualung Rocket Fin, Apeks RK3, ScubaPro Jet Fin, and OMS Slipstreams.

HEEL STRAPS

Open heel fins should have easy to use heel straps. No one wants to struggle getting fins on and off. This can be an issue making certain entries, especially through surf when you are timing the waves during your entry and when you’ve waded out far enough need to put your fins on quickly. When getting out of the water after a boat dive you want to be able to easily and quickly remove your fins if you are climbing a ladder. Getting your fins off quickly so you can climb out is especially important when conditions are rough.

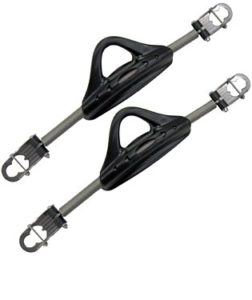
One choice for the strap is the traditional stainless steel buckle. The flat, rubber strap is adjusted for comfort and to keep the fin on your foot. They are less expensive, but can sometimes be a struggle to get on and off in the water as there is not a lot of “stretch” in the rubber strap. Another possible choice are straps with releasable buckles. I’m familiar with two versions. One allows the buckle to fold back, loosening the strap. The other unbuckles the strap completely. Only do this on one side getting out of the water. You don’t want to lose your strap!  The last choice I will discuss is a flexible strap that is made from material that will snug your fin around your heel, but can easily stretch to allow easy removal. These straps are made from either stainless steel spring, or rubber bungee cord. I personally use spring straps and prefer them for their toughness and ease of use. Aftermarket spring straps are available for many major brands. I purchased spring straps for my Mares Superchannel Fins while my OMS Slipstreams came with spring straps already installed.

Universal Spring Straps

BOOTIES

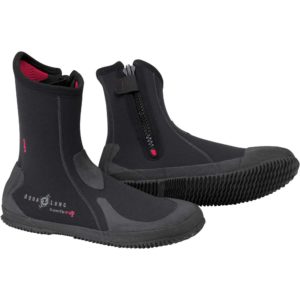
Booties or drysuit boots are pretty much a necessity for most shore diving or when diving in colder waters. Booties are typically made of neoprene with with hard rubber soles. Felt bottoms which can offer additional traction when crossing slippery rocks are also available. The best booties for you will depend on conditions. Temperature, shore or boat entries and if shore entries the type of shore. Sand or slippery rocks. Thickness will depend on water temperature and will typically be similar to your wetsuit. Tropical diving is usually 3 mm. For diving in tropical waters from a boat, low top booties will work fine. Many people prefer low tops for warm water diving in general. My personal preference that will meet most conditions here in Guam (and other tropical destinations) is felt bottoms with high tops. Shore entries here are often across slippery rocks or walking across the top of a reef. I like the extra grip of felt bottoms. I like the high tops for the extra protection for my ankles in case I step in a hole. Another thing to look for is good protection on the sides, heel, and top of the foot. A sole that will give protection adequate for the conditions you’re diving in (ie… rocky entry). A rubberized covering of the neoprene around the heel gives protection for the heel strap, and over the toes and the top of the foot will give extra protection for the foot when walking during a shore entry and the top of the foot when it’s inside the foot pocket of the fin. You get what you pay for. Without the extra protection I’ve seen holes worn into booties in less than a year from just normal wear. It generally pays to get quality in the long run.

CONCLUSION

I hope I’ve provided some things to think about when choosing equipment. I’m sure that I’ve missed a few things 🙂  Again, as I mentioned in the beginning, I always suggest consulting with your instructor or your local dive shop as well. They very well may have other things to consider that I may have missed. Experienced divers can have strong opinions about equipment and it’s always good to hear their reasoning. Being open to new knowledge is a good thing!

Choosing a Snorkel

This is the second installment of my series on choosing equipment. I’m writing this series more for the beginning diver. As always I recommend that checking with your instructor is a good idea (they may not agree with all my ideas 😉 ). You’ll find that the retail staff at your local dive shop can also be a great help when purchasing dive gear. Having some information to start with though can help provide a basis for discussion. The first installment, if you missed it, was on “Choosing a Mask”. This time I’m going to write about snorkels.

When I was 12 I purchased my first set of really good quality snorkeling equipment from Copeland’s in Corpus Christi, Texas. (in case y’all were wondering that would have been in 1970 😉 ). Copeland’s was the first dive shop I ever went in. My father was working in Corpus Christi and I was visiting him for the summer. When I saw the dive shop I begged him to stop. (I’d already became enamored of diving from watching Sea Hunt re-runs and The Undersea World of Jacques Cousteau on TV). I walked out with a set of ScubaPro snorkeling equipment 🙂 The snorkel, of course, was the simple J type. With a little practice, it did the job quite well and it would actually be a few decades before I used any other type!

A snorkel is a required piece of equipment in the open water course. Below I’ll write about the two primary types of snorkels I believe are appropriate for scuba diving, and what I personally use. First I will discuss some of the reasons that having a snorkel is a good idea.

Here on Guam we are very fortunate to have many quality dive sites that can be dived from shore. It’s easier to find your descent point (the place you want to begin your dive) with your face in the water. That means breathing from a snorkel or your regulator. Although air consumption at the surface is minimal, that doesn’t mean that a diver doesn’t want to save all of their air for the actual dive!

Anyone who dives from a boat will likely find themselves at some point, coming up a distance away from the boat… not always by choice 🙂 If seas are choppy or rough then keeping your mask on your face to avoid water in your eyes and something in your mouth to breathe with is a good idea! A snorkel in these conditions comes in handy while waiting for the boat to pick you up.

Lastly, you may end up surfacing away from the boat or your exit point and have a long surface swim back.

In my opinion (some might not agree) for scuba diving the choices are really between the traditional “J” type snorkels or the “Semi-dry” snorkels. A dry snorkel is great for snorkeling, but not so much for scuba diving (or even freediving) in my opinion. They generally work quite well at keeping water out. But, since it doesn’t allow water in, the snorkel is filled with air and therefore is buoyant underwater. This may pull the mask away from your face breaking the seal. They normally use some type of valve to keep water out and this is another failure point (If you purchase one of these types spend the money for quality). The mechanism at the top of the snorkel that keeps water out also makes the snorkel a bit more top heavy. Some people swear by them for snorkeling and if by “snorkeling” you mean floating on the surface and observing what’s below, I can understand that. Again, just my opinion, but I don’t like them for scuba diving.

For those reasons, I consider either the traditional J style or a semi-dry type to be the best choice. For both of these snorkels, you want to look for a comfortable mouthpiece made from silicone. Tubes can be from half an inch to an inch in diameter. The largest diameter is easier to breathe from but can be harder to clear. I personally own one of each type.

The traditional “J” snorkel, is basically just a tube in the shape of a J. These are the simplest design and what we all used when I first started snorkeling in the early 70’s. There have been a few improvements, mainly in areas like materials and comfort of the mouthpiece, but the basic idea remains unchanged. This is still the type preferred by many free divers and spearfishermen. They are very simple but require a certain amount of skill and practice to use. Swallowing seawater is no fun! Water can splash into the top and the water has to be blown out using your own lung power. There are two methods which are both taught in your Open Water course. There are both rigid and flexible types.

One innovation of this old design is materials. I have an Aqualung Nautilus Travel Snorkel made from soft silicone which rolls up, has it’s own case, and easily fits in a pocket. No purge valve or splash guard. This is the snorkel that’s normally attached to my mask these days when I’m teaching and shore diving in Guam. I saw this one in the shop after I came to Guam. I liked the compactness of it when it was rolled up so much that I bought it!

The Nautilus Travel Snorkel is a traditional design made up of soft silicone. It can be rolled up and put in a pocket making it readily available if needed.

The “Semi-dry” snorkel has a splash guard at the top which helps keep water out at the surface in the event of a wave or splash. This normally is accomplished in the form of slits or vents to divert water that splashes over the top. They don’t keep water out when fully submerged though so you will still have to clear it at the surface before using it. A purge valve at the bottom for water to drain out makes this easier. There is an area for the water to collect below the mouthpiece and a one-way valve there. Although this makes them much easier to purge, some would argue it’s a potential failure point. This is less of an issue for a snorkel than a mask in my opinion just due to the way a snorkel is utilized. I will say that I’ve had mine for years and it still works fine. The area between the mouthpiece and the tube that sticks out above your head is corrugated and flexible so that the mouthpiece will hang out of the way when the snorkel is not in use.

I’ve owned an Oceanic Pocket Snorkel for years. This one folds up and has a band to secure it. It’s not as compact at the Nautilus, but it still fits easily in a BCD or thigh pocket.

I really like both these snorkels. The semi-dry is definitely easier to purge and this is likely a factor to consider for a new scuba diver. The J type is normally less expensive if you purchase a traditional one. One like mine made from soft silicone so it can roll up is a bit more expensive.

I consider a snorkel to be an important piece of safety equipment. In a real emergency, in choppy seas, and with an empty tank and no boat in sight a snorkel could make all the difference. Although it’s never happened to me, it has happened to other people, so I think of it like insurance. Even when I take mine off my mask (for example when I’m diving in an overhead environment like a wreck penetration), I have a snorkel in one of my pockets if there is even a remote possibility of need.

Choosing a Mask

This post is aimed primarily at new divers and will be the first in a series on choosing equipment. It’s always a good idea to discuss equipment choices with your instructor. The retail staff at your local dive shop can be a big help as well. Hopefully this post will provide some things to talk about with them 🙂 I’m going to share some thoughts I have about choosing a mask for diving. What to look for. What kind of choices are out there. Things to think about. Things to be aware of.

When it comes to dive gear in general, what’s most important is fit, comfort, and quality. It pays to buy quality and money spent on that will pay off in the long run. Dive equipment, in general, is built to last and as long as it’s properly cared for and serviced on a regular basis, it will give you years of service.

The first items that someone who is new to scuba diving will purchase are a mask, snorkel, fins and booties. Today we’re going to discuss masks.

Masks have come a long way from the high volume, black rubber, oval-shaped, mask that I started with back in the 70’s, but they all basically still do the same thing… They cover your eyes and nose, providing an air space so that we can see clearly underwater and equalize our ears. A mask is one of your most important purchases as a mask that is uncomfortable or a poor fit can ruin your dive.

Today’s masks come in different designs. You can get single or double lenses, side lenses, black or clear silicone. It should go without saying, but don’t buy a mask made from cheap rubber or PVC with plastic lenses. These are not suitable for scuba diving. 100% Silicone is the material of choice and lenses should be tempered glass. Choose a mask with a wide skirt (the part of the mask that seals against your face). This will create a better seal. Frames are available in a variety of colors.

Volume refers to the size of the airspace within a mask. Some will prefer the increased feeling of openness and greater peripheral vision of a high volume mask. Be aware though that these masks will require more effort to clear, especially when fully flooded. A low volume mask is easier to clear and seal to your face. I recommend staying away from purge valves. Some like them, especially for snorkeling, but I see it as a potential failure point.

Silicone is available in colored (opaque) or clear. Many divers prefer clear silicone (Some people might feel a little claustrophobic I’m told, although I’ve never experienced this myself). Someone who wants more peripheral vision can also opt for a mask with side windows. These are available in both single lens and double lens masks.

Photographers often prefer black silicone based on the theory that blocking light from the sides cuts down on glare and makes it easier to see through the viewfinder of a camera. Clear silicone can discolor over time, especially if stored with rubber. That doesn’t affect using the mask though, just the cosmetics. Both work well so it really boils down to personal preference.

Single lens masks are probably the most common and many people like them. One potential issue is that they generally have a smaller nose pocket, so fit can be an issue. If you feel any pressure at all on your nose when trying on the mask, then a double lens mask could be the solution. Double lens masks have room for a larger nose pocket. You really don’t notice the divider in the middle. No more than the divider in a pair of sunglasses. Your eyes will focus beyond that.

Then we have frameless masks. A single lens is joined directly to the silicone skirt. They are very low volume, lightweight, and flexible. This can be an excellent choice if you can find one that is a good fit.

Let me also mention a bit about coated lenses. Anti-reflective coatings are great for experienced divers. They reduce reflected light and increase transmission… what’s not to like? The problem (especially applicable to students, new divers, and instructors) is that a mirror effect resulting from the coating makes it difficult to see the eyes of the diver wearing the mask. Not being able to see the instructors eyes can be intimidating to students. Not being able to see a students eyes can be problematic for the instructor by making it more difficult to evaluate the students condition.

Now that we’ve discussed different kinds of masks, lets talk about fitting them. When looking at masks, most important is fit and comfort (also true of other gear we will talk about in future blog posts). Choose one that will fit your face and will provide a good seal without the strap. Push the mask against your face creating a vacuum. Make sure that you don’t have any of your hair breaking the seal. If the mask stays in place and no leaks are detected, then it should be a good fit. Without a good fit, the mask will leak!

While trying on the mask, once you’ve determined you have a good seal, then make sure that the mask skirt isn’t digging into your nose and feels comfortable around your upper lip and temples. Also be aware if there are any spots where you feel pressure on your nose or forehead, especially between the eyes. Make sure there is room.

Check that you are able to pinch your nose in order to equalize. If the nose pocket is too big you might have trouble. Now put the mask on fully with the strap. You should get a good fit with minimal strap pressure. Make sure the strap is sitting on crown at the back of your head and not on your ears.

The strap is there to keep the mask from being dislodged. Water pressure should be more than enough to seal the mask against your face if it’s a good fit. Tightening the strap to fix a leaking mask normally backfires and just makes the leak worse as a too-tight strap can distort the skirt!

Your mask will come with a silicone strap. You can replace this strap with a neoprene slap strap or cover that will fit over the silicone strap. You’ll find this to be more comfortable and it will virtually eliminate pulled hair.

Caring for your mask is important. Here are a few tips.

Once you’ve purchased your mask before using it the first time you will need to clean it. Agents used during the manufacturing process end up create a thin film on the lens of the mask. This causes it to fog quite easily. A paste toothpaste or liquid scrub can work. There are also products like Sea Buff, that are sold at most dive shops that will do the trick. Be sure to treat both the inside and outside of the mask lens. It may take more than one application. An old tip was to burn the film off. This is not recommended by manufactures.  Applying a lighter to the glass of a new mask to remove the film has been linked to weakening the lens, causing it to shatter. Using a lighter will void any warranty on the mask. Follow manufactures recommendations when it comes to cleaning.

Hold on to the mask box that your mask comes in. Rinse your mask in fresh water after use. Remember that bugs love silicone so once it’s dry put it away in its box! Keep it out of direct sunlight as much as possible. When it comes to defog a product like Sea Gold goes a long way. Some people use a solution of baby shampoo and a lot of the “old-timers” still just use spit 😉

I hope these tips will help you find the perfect mask! Everyone has a unique face, so take your time and try on several masks. It will be time well spent.