I know it’s been a few months since I posted…. I’m going to finish up here and then in my next post I’ll write about what I’ve been doing 🙂
As I’ve mentioned in my earlier blog posts on choosing equipment, I’m writing these pieces mainly for those who are new to diving. They reflect my opinion and experience. I always suggest that you seek advice from your instructor as they may have a different and maybe a better way than I do 🙂
TYPES
Fins are basically divided up into two types… full foot, that you put on like a slip-on shoe, and open heel fins with straps. There are several variations of these two types. There are bladed fins with different materials to channel the water when kicking. Those may be stiff or flexible, or somewhere in between. There are versions of the standard blade fin that are split, and another version which has vents to channel water. There are shorter fins designed for snorkeling and very long fins used in free-diving.
FULL-FOOT
Full-foot fins tend to be lighter in weight. Many are designed for snorkeling so make sure the ones you choose are heavy enough to do the job. Short and very lightweight fins that are adequate for snorkeling will not provide enough thrust for scuba diving. Some divers prefer full-foot fins when diving from a boat or a sandy beach in tropical water. These fins are worn with bare feet or thin socks. In areas where the water is colder they would not be suitable as booties would be required for warmth. Booties are also a requirement for many beach entries especially across rocks or coral. I have a few friends who use free diving fins (a whole different animal from standard snorkeling fins) when boat diving and swear by them. Freediving fins have a larger surface area which gives them more thrust. This larger surface area is the result of being much longer giving them a “snap” as the diver kicks which generates even more power.
A good quality full-foot fin will have a solid, rigid sole which is more efficient in transferring energy from the foot to the blade of the fin. A full-foot fin should have enough space to insert your pinky in between your heel and the back of the foot pocket. If you can’t get your pinky in, then the fins are likely too tight. To much space and the fin will be too loose. These type fins will definitely be more slippery in the water and feel looser, so keep that in mind. Make sure there are no spots digging into your foot. Sit on a stool or chair and flex your feet. If your toes are sticking out make sure they’re not squeezed or that the top edge is rubbing. If your feet are prone to cramping or blistering, this may not be the best choice.

OPEN HEEL
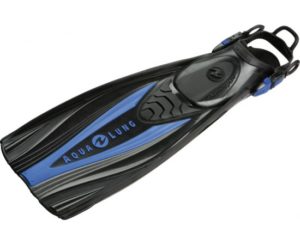
Most scuba divers use open heel fins with straps that are designed to be worn with booties or boots. These fins are available in a variety of materials and versions. Materials include, monoprene, polyprophlene, thermoplastic, and of course rubber. Some fins will combine these materials. The main variation in design will be blade fins (with a variety of stiffness), split fins, and vented fins. Most new divers (and many experienced ones) stick with the standard blade fin.

Fins can have differences in flexibility. Stiff fins are generally considered superior for frog kicking and maneuverability. They work well for backing up or for maneuvers like the helicopter turn. For a standard flutter kick though, the added resistance can bring on fatigue much quicker for those who are not conditioned for it. A more flexible fin is easier to kick with and is less tiring.
Split fins have a section removed from the center, thus “splitting the fin”. The theory behind split fins is that on the down stroke (the power stroke) the fin creates a “vortex” adding to forward propulsion. On the upstroke, which doesn’t provide as much power anyway, resistance is lowered by allowing water to flow through the split. It’s a popular design for divers who have ankle or knee problems or who cramp easily. Easier kicking can also translate into better air consumption.
The primary con with split fins and very flexible fins, is that they do not provide as much propulsion as the stiffer blade fins. They lack the power in dealing with current that a stiffer fin provides. They are not as effective in frog kicking, backing up, or performing maneuvers like helicopter turns. The stiffer fin is superior for these maneuvers.
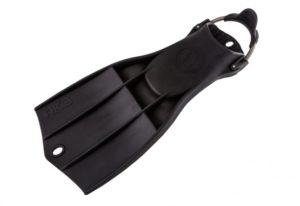
A popular fin for tech divers, cave divers, wreck divers, and underwater photographers is a version of the bladed fin sometimes called turtle fins. These fins tend to be a bit shorter and wider than a standard bladed fin. They are stiff and have vents that allow water to pass through reducing drag and increasing efficiency. They require strong legs, especially for the flutter kick. They will move you through the water quickly and efficiently. These fins are much more effective at fighting current than lesser versions. They are superior for maneuverability as well. Versions include the Aqualung Rocket Fin, Apeks RK3, ScubaPro Jet Fin, and OMS Slipstreams.

HEEL STRAPS
Open heel fins should have easy to use heel straps. No one wants to struggle getting fins on and off. This can be an issue making certain entries, especially through surf when you are timing the waves during your entry and when you’ve waded out far enough need to put your fins on quickly. When getting out of the water after a boat dive you want to be able to easily and quickly remove your fins if you are climbing a ladder. Getting your fins off quickly so you can climb out is especially important when conditions are rough.
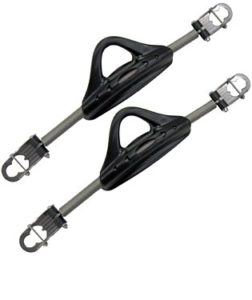
One choice for the strap is the traditional stainless steel buckle. The flat, rubber strap is adjusted for comfort and to keep the fin on your foot. They are less expensive, but can sometimes be a struggle to get on and off in the water as there is not a lot of “stretch” in the rubber strap. Another possible choice are straps with releasable buckles. I’m familiar with two versions. One allows the buckle to fold back, loosening the strap. The other unbuckles the strap completely. Only do this on one side getting out of the water. You don’t want to lose your strap! The last choice I will discuss is a flexible strap that is made from material that will snug your fin around your heel, but can easily stretch to allow easy removal. These straps are made from either stainless steel spring, or rubber bungee cord. I personally use spring straps and prefer them for their toughness and ease of use. Aftermarket spring straps are available for many major brands. I purchased spring straps for my Mares Superchannel Fins while my OMS Slipstreams came with spring straps already installed.

BOOTIES
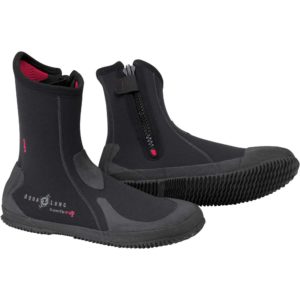
Booties or drysuit boots are pretty much a necessity for most shore diving or when diving in colder waters. Booties are typically made of neoprene with with hard rubber soles. Felt bottoms which can offer additional traction when crossing slippery rocks are also available. The best booties for you will depend on conditions. Temperature, shore or boat entries and if shore entries the type of shore. Sand or slippery rocks. Thickness will depend on water temperature and will typically be similar to your wetsuit. Tropical diving is usually 3 mm. For diving in tropical waters from a boat, low top booties will work fine. Many people prefer low tops for warm water diving in general. My personal preference that will meet most conditions here in Guam (and other tropical destinations) is felt bottoms with high tops. Shore entries here are often across slippery rocks or walking across the top of a reef. I like the extra grip of felt bottoms. I like the high tops for the extra protection for my ankles in case I step in a hole. Another thing to look for is good protection on the sides, heel, and top of the foot. A sole that will give protection adequate for the conditions you’re diving in (ie… rocky entry). A rubberized covering of the neoprene around the heel gives protection for the heel strap, and over the toes and the top of the foot will give extra protection for the foot when walking during a shore entry and the top of the foot when it’s inside the foot pocket of the fin. You get what you pay for. Without the extra protection I’ve seen holes worn into booties in less than a year from just normal wear. It generally pays to get quality in the long run.


CONCLUSION
I hope I’ve provided some things to think about when choosing equipment. I’m sure that I’ve missed a few things 🙂 Again, as I mentioned in the beginning, I always suggest consulting with your instructor or your local dive shop as well. They very well may have other things to consider that I may have missed. Experienced divers can have strong opinions about equipment and it’s always good to hear their reasoning. Being open to new knowledge is a good thing!


